
Opt Out Guides

Public Information Services Opt Out Guide
See what Public Information Services knows about you
880,417 have already made this search
Privacy Writer
A. J. MercerAva J. Mercer
Updated
Read
5 min
See what Public Information Services knows about you
880,417 have already made this search
If your name, home address, and phone number appear online, it can create privacy and security risks. These are identity theft, unwanted solicitations, and targeted marketing. Public Information Services is a people-search platform that may display personal details, such as addresses and relatives, based on information from publicly available sources and commercial databases. This 2025 step-by-step guide helps you remove your personal information and take control of your digital footprint for better online privacy and data privacy. You’ll get quick steps, screenshots, official links, and a simple timeline. Review valuable tips for handling email issues and repeat listings to strengthen your data privacy. It also explains why your details can show up in search results and how to limit future exposure.
How to opt out of Public Information Services
Go to the official Opt Out page, search the database for your listing, submit your email/phone, complete the CAPTCHA, then confirm using the link provided. It usually takes 7–14 days for removal.
Checklist:
- Open the official opt-out form and get started
- Enter identifiers (email/phone/name)
- Confirm via code/link and save the confirmation email
- Set a reminder to resubmit
Find out if your private details were exposed
880,417 have already used our service
Public Information Services – Quick Facts
| Parameter | Value |
| Domain | publicinfoservices.com |
| Data Types | contact information, addresses, and possible social identifiers |
| Opt-out Methods | web form (Privacy Requests) |
| Identity Check | verification email |
| Typical Response Time | 7–14 days |
| Re-listing Risk | medium |
Public Information Services is a people-search service that can show public record data. Some pages may also display information from data broker sites and data partners. If a detail is unclear, assume it comes from public records and commercial sources.
Common data you may find:
- Full name
- Current and past addresses
- Email address
- Phone
- Relatives or household links
- Consumer records
- Court records
- Criminal records
- Financial history
Step-by-Step Guide
Open the official opt-out form
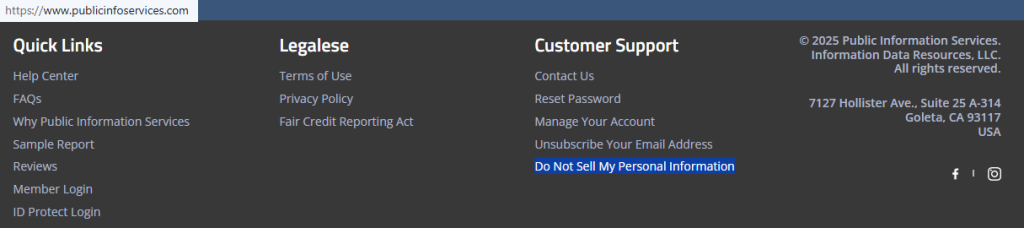
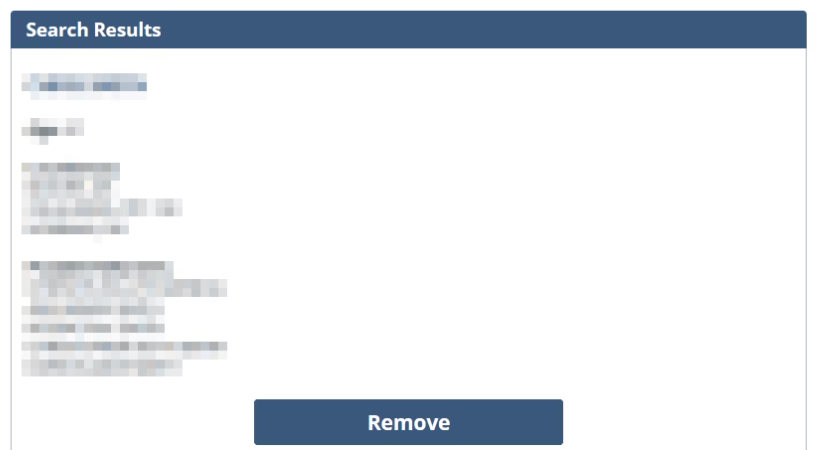
Open the homepage in your browser and scroll to the footer. Select the “Do Not Sell My Personal Information” link to reach the privacy portal (publicinfoservices opt-out). This opt-out process usually starts with a search box that pulls listings from the database. Choose the record that matches you. Then, proceed to the next screen. Before you capture any screenshots, blur or redact sensitive information. This is an online opt-out, and it’s helpful to write down the record URL or a short note for follow-up. Finish by opting out of publicinfoservices and keep the page open until you see the receipt.
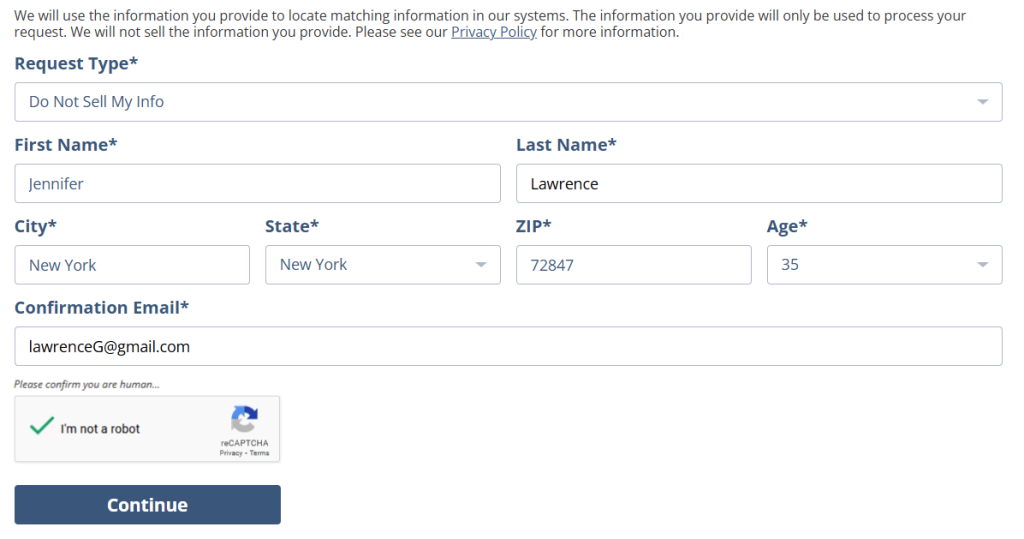
Submit your identifiers (email/phone + CAPTCHA)
On the Privacy Requests form, locate the fields and enter your identifiers. To continue, enter your email address and add a phone if requested. Submit one removal request and wait for the page to finish loading. Double-check that the profile you selected matches your record before submitting. For any screenshots you keep, blur or redact personal information so your notes stay clean. If you need to repeat the request later, reuse the same steps and keep your notes minimal so you are not storing extra details.
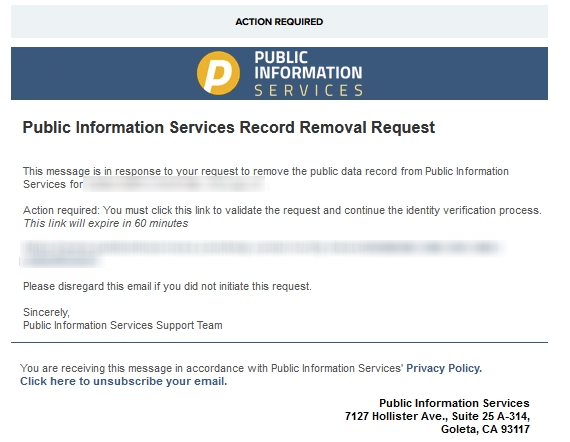
Verify via code or link (email/SMS)
After submission, a verification message is sent to your email. Check your email inbox and look for the message. Open it and click the link to confirm the request. If it doesn’t arrive, look in Spam or Promotions before resending it once. Save the email you received. You can reference it later if support asks for proof, and redact any identifiers if you screenshot the message.
Confirm deletion / Do-Not-Sell request
Once your request is verified, you should see a status screen, and you may get a final email receipt. This supports a data broker opt-out and keeps a record of your opt-out request for follow-up. If you want to remove your data and submit deletion requests under the California Consumer Privacy Act (CCPA), use the same privacy flow and keep any reference details. If you act as an authorized agent for an individual’s request, be ready to show authorization if asked. Keep screenshots private and redact any identifiers before saving them.

Track Confirmation & timeline
File your receipt and note the date you submitted. Typical processing is 7–14 days, and sometimes listings take longer to disappear if matching needs extra time. If nothing changes after 14 days, submit one more removal request and then use the contact page for help. Keep this folder for privacy and security, and to validate later that the request was accepted. Information may be updated in future refreshes, so keep a 3–6 month reminder on your calendar and check again using the same search terms.
Alt text: “Save receipt in email folder
Timelines, Verification & What to Expect
The entire process is not time-consuming, and most requests are handled in 7–14 days, but timing varies by workload and how clearly your listing matches. You may see a status screen right away, and you should also receive a single receipt email after you verify. If you do not receive it, look in Spam, wait a bit, and resubmit a single time if needed. Keep your records so you can remove your info quickly if a listing returns, and so you can opt out of data again later without redoing everything from scratch. To reduce mistakes, write down the record link you selected, save your receipt, and avoid submitting duplicates on the same day. If nothing changes after 14 days, use the site’s support contact path and include the record link.
Edge Cases & Troubleshooting
- No access to the original email/phone: Use a current address you control, or contact support to update the email address.
- “Record not found”: Try variations of your name, initials, or a prior address; some entries are indexed differently.
- Submission errors: Clear cookies, switch networks, slow down, and try again once.
- Verification code not arriving: Wait a few minutes, check Spam, then resend one time.
- Form rejects the request by region (EU/UK/CA): Use the site’s privacy page for regional routes or contact support for the correct path.
- Account or subscription issue: If you need to cancel, do it in your member area; listing suppression is separate from paid plans.
- Re-submitting after a failed attempt: If the page times out, try later; don’t submit repeatedly in a loop.
Will my data reappear?
Listings can return when data brokers refresh feeds, a broker gets updated records, or matching changes (like a new address or spelling). The re-listing risk is medium, so be proactive: regularly monitor every 3–6 months, keep your receipts, and re-submit quickly if your profile returns. To reduce recurrence, opt out of PublicInfoServices and other data broker sites that show the same contact details, since brokers like these often share updates across platforms. It also helps to check close-name variations and old addresses, then request suppression for each match you find. Keep a short folder of receipts so you can show what you submitted if you need support later. If you move or change phone details, repeat the request soon after the change so older records are less likely to resurface.
Related removals
- 411.com
- Whitepages
- Spokeo
- TruePeopleSearch
- Intelius
- BeenVerified
Manual vs Assisted Removal
Manual:
- Pros: You do it manually and keep full control; you can document each request.
- Cons: You must monitor and repeat requests; more work across many sites.
Assisted:
- Pros: Faster turnaround with a tracking dashboard; support for follow-ups and tracking.
- Cons: Some services offer subscriptions.
We remove your data for you - faster, verified, trackable.
Discover Which Sites Share Your Private Details—Instantly and Free.
880,417 have already used our service
FAQ
Email steps help prevent automated abuse and help confirm you control the inbox. Use a dedicated address if you prefer, and save your receipt so you can reference it later if the listing does not change. If you entered the wrong inbox, repeat the form with the correct address and keep only one active request at a time.
Wait a minute, then open the message again. If it still fails, copy the URL into a new tab. Avoid rapid repeats, since some systems rate-limit short bursts and may block the link temporarily. If you suspect a copy mistake, return to the message and try again carefully.
The flow typically requires an email to confirm that you take control of your personal inbox. Consider using an alias address that forwards to your main inbox. Keep the receipt so you can show you completed the steps if you need support.
Many sites monetize access. For privacy actions, look for footer privacy links and separate request tools; sites like public information services often separate paid access from removal tools and help pages. If you see a payment offer, scroll down or check the footer for the privacy link instead of purchasing.
It’s hard to clear every listing permanently because new records and variations can surface over time. Focus on the biggest sites first, keep receipts, and repeat your requests every few months. If you find duplicates, handle one listing at a time and keep your notes short so you do not store extra personal data.
Open the Privacy Requests form, submit your identifiers, and confirm in your inbox. If you do not see the footer links, scroll to the bottom of the page.
Usually, your first and last name and location, plus an email for the receipt. If offered, SMS can be used to finish using a code. Only provide what the form requests, and avoid adding extra identifiers in free-text fields unless you are instructed to do so.
A typical window is 7–14 days. If the listing remains after that, submit one more request and keep your notes. If the listing still appears, use the support contact page and include the record link so support can locate the same entry.
Not always. Listing suppression hides the listing, while account closure relates to access. Use the privacy form for listings, and utilize account tools for subscription changes. If you are unsure which you need, start with listing suppression first. If you never created an account, you can still submit the privacy form.
Start with major data brokers. Then, expand to other broker pages that show the same profile. Keep receipts and set reminders so you can repeat the steps if new listings show up later.

Posted by Ava J. Mercer
More Background & Criminal Removal Guides
- AdvancedBackgroundChecks Opt Out Guide
- Affordable Background Checks Opt Out Guide
- ArrestFacts Opt Out Guide
- Background Check Gateway Opt Out Guide
- BackgroundCheckers Opt Out Guide
- BackgroundChecks.com Opt Out Guide
- CyberBackgroundChecks Opt Out Guide
- EasyBackgroundChecks Opt Out Guide
- GovernmentRegistry Opt Out Guide
- GovWarrantSearch Opt Out Guide
- InfoTracer Opt Out Guide
- JailBase Opt Out Guide
- LocatePeople Opt Out Guide
- MugshotLook Opt Out Guide
- Mugshots Opt Out Guide
- National Public Data Opt Out Guide
- Public Information Services Opt Out Guide
- Public Information Services Opt Out Guide
- Search Public Records Opt Out Guide
- SearchQuarry Opt Out Guide
- SmartBackgroundChecks Opt Out Guide
- SpyFly Opt Out Guide
- TruthRecord Opt Out Guide

