Opt Out Guides
GovernmentRegistry Opt Out Guide
Privacy Writer
A. J. MercerAva J. Mercer
Updated
Read
5 min

GovernmentRegistry can display your name, address, and phone number, which may expose you to unwanted contact and make privacy harder to manage. It generally presents listings built from public record sources and commercial databases, then groups them into one listing page. Listings may also include emails, relatives, and past locations. Even if details are old, they can still appear in a background check or casual lookup.
How to opt out of GovernmentRegistry
Use the opt-out page and submit your name/email/phone. To opt out of governmentregistry.org, confirm the code or link (CAPTCHA + one verification step), then save the confirmation for your opt-out request and wait 7–21 days.
Checklist:
- Open the official opt-out form
- Enter identifiers (email/phone)
- Complete CAPTCHA
- Confirm via email
- Save the confirmation email
- Set a reminder to repeat
Find out if your private details were exposed
have already used our service
Government Registry – Quick Facts
| Parameter | Value |
| Domain | governmentregistry.org |
| Data Types | contacts and similar details |
| Methods | web form/via email/mail |
| Confirming Step | confirmation email or SMS code |
| Typical Response Time | 7–21 days |
| Re-listing Risk | medium |
GovernmentRegistry describes itself as an online public records database that lets users search public records through its service, and the information displayed can vary by query. The site’s pages also note limits on how results may be used, including references to law enforcement contexts. It can collect details from public sources and other sources, then aggregate them on one platform for lookup, similar to a background check.
Common data you may find:
- Names (and known aliases)
- Phone numbers
- Email addresses
- Current and past locations
- Relatives or household links
- Property-related entries
- Court or case references (if available)
Step-by-Step Guide
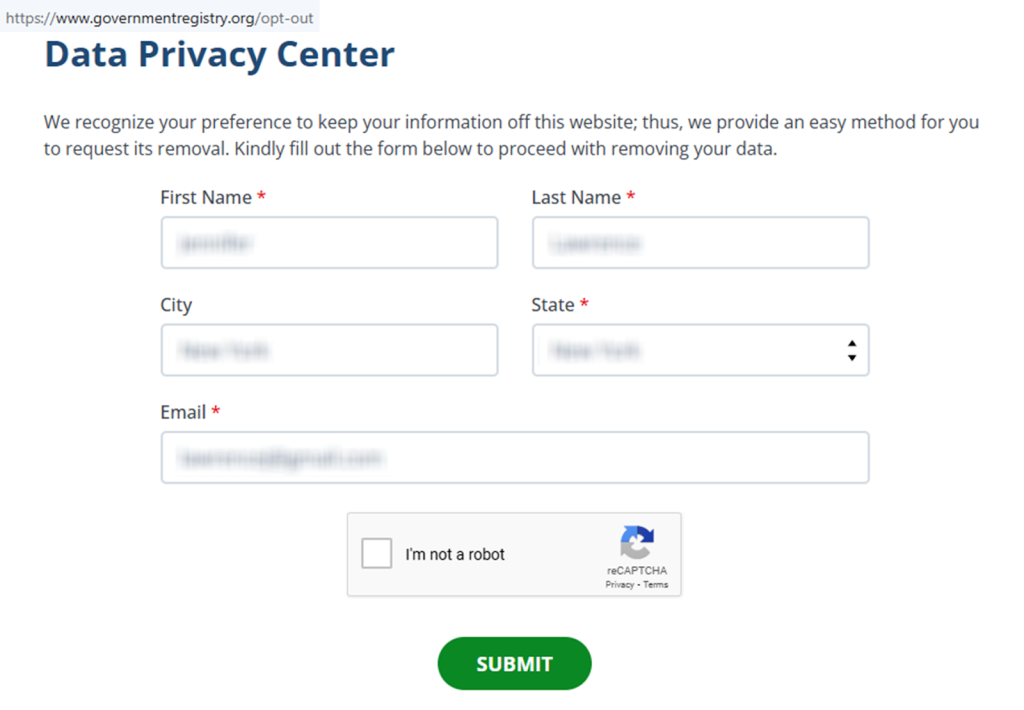
Open the official opt-out form
Go to the form page (https://www.governmentregistry.org/opt-out). If the page is slow, refresh once or try another browser. If you see multiple links, pick the one that mentions removing a listing rather than paid reports. Save a screenshot for your own records. Tip: Blur anything sensitive first, especially contact fields and IDs.
Submit your identifiers (email/phone + CAPTCHA)
Enter your email and/or phone, plus any matching details the form asks for, then complete the CAPTCHA and click “Submit.” Use the same spelling you see on the listing and try common name variations if the first attempt fails. If there’s a field for a listing URL, paste it from the URL bar so the team can match the correct entry. Only fill in required fields; leaving optional fields blank can reduce how much data you share. For screenshots, redact emails and numbers so you don’t share private data or personal information. Tip: If CAPTCHA expires, reload the page and try once more.
Verify via code or link (email/SMS)
Watch for a message with a link. If nothing arrives, check Spam or Promotions and wait a few minutes before trying again. Keep the confirmation email as proof. Tip: Add the sender to your safe list so you don’t miss the message.

Confirm deletion / Do-Not-Sell request
After confirmation, look for an on-page success message or an email receipt. Some pages offer more than one checkbox or dropdown; select the option that matches “remove listing” rather than marketing preferences. If you submit for multiple name spellings, repeat the form once per variation and keep each receipt. Use this step to remove your personal data even when it appears under a business name variation. Tip: Take a note of any case number or reference code shown on-screen.
Track confirmation & timeline
Note the date you sent the request. Re-check the listing after 7–21 days. If it still appears, send one more request and keep the receipt. Store your receipts in a single folder (email or PDF) so you can compare dates and confirm what was submitted. Set a calendar reminder for 3–6 months to repeat the form if the listing returns. Tip: When you share proof with support, blur names, numbers, and any account identifiers.
Timelines, Verification & What to Expect
Most submissions show an on-page “submitted” notice right away and a confirmation email shortly after. Processing often completes within 7–21 days. However, it can vary when the listing is hard to match or when there are multiple similar entries. If no email arrives within 24 hours, check Spam and Promotions, confirm you typed your email correctly, and resubmit once. If there’s still no change after 21 days, use the contact option on the official page.
Edge Cases & Troubleshooting
- No access to the original email/phone: Use a current email if allowed; include the listing URL to help with matching.
- “Record not found”: Try a broader last-name lookup and state, then use the listing URL if you find it.
- CAPTCHA or submission errors: Clear cookies, disable blockers, and try again in a different browser.
- Code not arriving: Wait 10 minutes, check Spam/Promotions, then resend once.
- Region blocks (EU/UK/CA): Use the privacy contact method and ask what options apply in your region.
- Account vs listing confusion: If you have a paid account, you may be able to cancel it separately from removing the public listing.
- Re-submitting after a failed attempt: Resubmit once with the same identifiers and keep the receipt.
Will my data reappear?
A listing can return when an aggregator refreshes from third-party partner feeds, when resellers republish, or when new public sources are added to the database. Small differences in name spelling, location history, or phone formatting can also cause duplicate profiles to be rebuilt over time. Re-listing risk is medium, so set a 3–6 month reminder, keep confirmation emails, and submit again quickly if your profile comes back. Save the listing URL online and note the dates so you can spot patterns and act faster next time. To reduce your digital footprint and limit identity theft risk, repeat the same steps on each data broker you find when you look up your name, and consider checking a few closely related people-lookup websites too.
Related removals
- BeenVerified
- InfoTracer
- PeopleFinders
- Spokeo
- Whitepages
- Intelius
Manual vs Assisted Removal
Manual:
- Pros: More control and a clear record of what you sent; no subscription, but you must monitor and repeat.
- Cons: Doing it manually across many sites can be repetitive; you may need extra follow-ups if emails don’t arrive.
Assisted:
- Pros: Faster workflows that can automate repeated checks; a dashboard for tracking, plus automated removal.
- Cons: Service cost; you may still need to confirm a link.
“Excellent”
We remove your data for you - faster, verified, trackable.
Discover Which Sites Share Your Private Details—Instantly and Free.
have already used our service
FAQ
Receive expert privacy advice by email - 1-2 times per month, no fluff.
Share Article

Posted by Ava J. Mercer
Ava J. Mercer is a privacy writer at ClearNym focused on data privacy, data broker exposure, and practical privacy tips. Her opt-out guides are built on manual verification: Ava re-tests broker opt-out processes on live sites, confirms requirements and confirmation outcomes, and updates guidance when something changes. She writes with a simple goal - help readers take the next right step to reduce unwanted exposure and feel more in control of their personal data.
View AuthorMore Background & Criminal Removal Guides
- ArrestFacts Opt Out Guide
- BackgroundCheckers Opt Out Guide
- BackgroundChecks.com Opt Out Guide
- GovernmentRegistry Opt Out Guide
- GovWarrantSearch Opt Out Guide
- InfoTracer Opt Out Guide
- MugshotLook Opt Out Guide
- National Public Data Opt Out Guide
- Public Information Services Opt Out Guide
- SmartBackgroundChecks Opt Out Guide
- TruthRecord Opt Out Guide