Opt Out Guides
Public Data Check Opt Out Guide
Privacy Writer
A. J. MercerAva J. Mercer
Updated
Read
5 min

When your name, home address, and phone number are easy to find, it can create unwanted contact and safety risks. You may see personal information appear on people-search sites, even if you never made an account. Sites like Public Data Search often pull information from widely available sources, then organize the details into one profile. If you want to remove your sensitive data, this guide will cover quick steps, screenshots, and a simple timeline so you can act fast and keep proof. You’ll learn what to provide and where to click, plus what to do if the email does not arrive or the listing returns later.
How to opt out of Public Data Check
Use the official page to find your listing, enter your email address (and phone if asked), complete CAPTCHA, then use a code or click the link sent to you. Processing usually takes 2–5 days, and you should save proof for follow-up.
Checklist:
- Open the official form
- Enter identifiers (email/phone)
- Complete verification
- Use a code/link
- Save the confirmation email
- Set a reminder to re-opt out
Find out if your private details were exposed
have already used our service
Public Data Check – Quick Facts
| Parameter | Value |
| Domain | publicdatacheck.com |
| Data Types | contacts, addresses, relatives’ profiles, property and court entries |
| Opt-out Methods | web form (official portal) |
| Identity Verification | code/email step + confirmation email |
| Typical Response Time | 2–5 days |
| Re-listing Risk | medium |
This service is a consumer people search tool that may display public information by compiling various public records and other commercial sources into a single profile. It offers privacy requests through its official portal so you can opt out of public data shown in people reports and pass email-based verification when processed.
Common data you may find:
- Names and aliases
- Phone numbers
- Email addresses
- Current and past addresses
- Age range or year of birth
- Relatives or household profiles
- Property records
- Court items (where available)
- Vehicle-related entries (where permitted)
- Employment/education signals (if shown)
Step-by-Step Guide
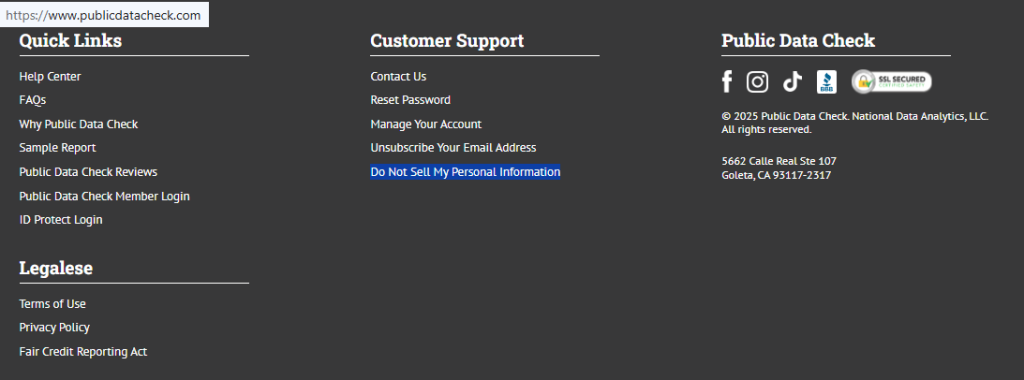
Open the official form
Go to the main website and scroll to the footer. Under “Customer Support,” find the “Do Not Sell My Personal Information” option and open it in the same browser tab. Keep the page open until you finish so the session does not time out. Blur any personal information.
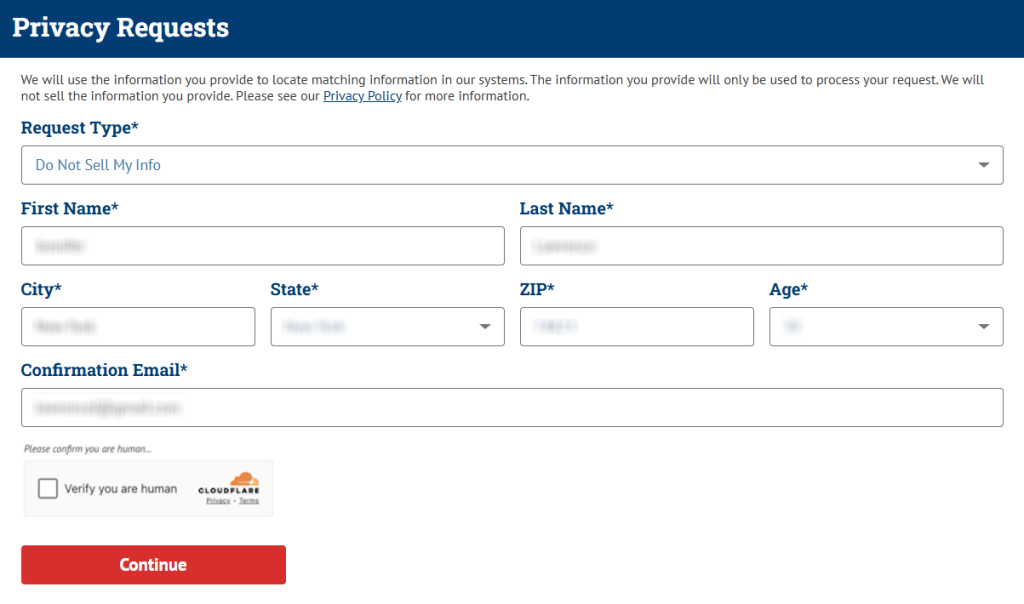
Submit your identifiers (email/phone + CAPTCHA)
On the form, enter your first name, last name, and any extra fields shown (like state and age range). Use the drop-downs as needed. Select the closest matching profile if the form shows more than one. When prompted, provide the email address you can access. Skip optional fields you do not recognize. If you screenshot the form, redact contact fields first.
Verify via code or link (email/SMS)
After you continue, watch your email inbox for the message. Please review your Spam folder if it does not arrive within a few minutes. Open the message, check your email for the button, and click the link to validate the action. Save the email and note the date you completed the action. If you share proof with someone, black out any codes and your listing data first.

Confirm deletion / Do-Not-Sell request
Once the site shows the final status screen, confirm the request and record the date for your notes. If you see options, keep the deletion query focused on removing the public listing, and use an information request only when you want an access copy. Keep your notes separate so you don’t mix outcomes. If you realize you picked the wrong profile, return to the form and repeat the steps for the correct record.

Track confirmation & timeline
Most people receive an email within a few days after the email step. Keep a small log with the record page you handled. If nothing arrives after 5 days, use the Contact Us option and ask the support team to look up your submission, then submit a request one more time. Keep your email so the customer agent can locate your entry faster.
Timelines, Verification & What to Expect
Typical processing is 2–5 days, based on the provider’s published metrics. If you get no response after 5 days, double-check the email you used, look in Spam, and retry once. If a second attempt still fails, use the official support route and provide the date. It is prohibited by law to use this service for employment, insurance, consumer credit, tenant screening, or any other purpose under the Fair Credit Reporting Act; it does not provide consumer reports, and you should be extremely careful with any criminal item because the listing may not be accurate.
Edge Cases & Troubleshooting
- No access to the original email/phone: Use the official support route and ask what alternate method is available; share only what is needed to match your record.
- “Record not found”: Try age-range or address variations and try again; some people have more than one record.
- CAPTCHA or submission errors: Refresh once, switch device, and try later; repeated rapid attempts can fail.
- Form rejects the request by region (EU/UK/CA): Regional rules vary; ask for guidance through official support.
- Account deletion vs. public listing deletion confusion: If you only want to unsubscribe, use the account path; deletion is separate.
- Re-submitting after a failed attempt: Keep your prior proof, wait a day, then retry and note the data that changed.
- Can’t find the right path: Use the help center and reference information from Public Data Check so an agent can route you correctly.
Will my data reappear?
Listings can reappear when aggregators refresh profiles from partner feeds, resellers, and newly updated public data. Even after deletion, a later update can recreate a similar profile, especially when names or addresses match across sources. To reduce repeat exposure, keep your emails and a short log, then redo the same steps as soon as the profile returns. Setting a 3–6 month reminder helps you catch changes early. If you found the listing via search results, save the date you saw it for comparison later.
Related removals
- Spokeo
- Whitepages
- BeenVerified
- Intelius
- PeopleFinders
- Radaris
- FastPeopleSearch
- TruthFinder
Manual vs Assisted Removal
Manual:
- Pros: more control, faster changes when you act, and clear documentation for each site.
- Cons: time investment, repeated monitoring, and you may need repeated removal when listings return.
Assisted:
- Pros: speed, tracking dashboards, and recurring checks that automate monitoring across a data broker list.
- Cons: you may still need to act on an email step, and coverage can vary by provider.
“Excellent”
We remove your data for you - faster, verified, trackable.
Discover Which Sites Share Your Private Details—Instantly and Free.
have already used our service
FAQ
Receive expert privacy advice by email - 1-2 times per month, no fluff.
Share Article

Posted by Ava J. Mercer
Ava J. Mercer is a privacy writer at ClearNym focused on data privacy, data broker exposure, and practical privacy tips. Her opt-out guides are built on manual verification: Ava re-tests broker opt-out processes on live sites, confirms requirements and confirmation outcomes, and updates guidance when something changes. She writes with a simple goal - help readers take the next right step to reduce unwanted exposure and feel more in control of their personal data.
View AuthorMore People Search Removal Guides
- 411.com Opt Out Guide
- Advanced People Search Opt Out Guide
- BeenVerified Opt Out Guide
- CheckSecrets Opt Out Guide
- Find People Fast Opt Out Guide
- GladIKnow Opt Out Guide
- Instant Checkmate Opt Out Guide
- OfficialUSA Opt Out Guide
- PeekYou Opt Out Guide
- PeopleFinders Opt Out Guide
- PeopleSmart Opt Out Guide
- PersonSearchers Opt Out Guide
- Public Data Check Opt Out Guide
- Radaris Opt Out Guide
- SearchPeopleFREE Opt Out Guide
- Social Catfish Opt Out Guide
- Spokeo Opt Out Guide
- ThatsThem Opt Out Guide
- TruthFinder Opt Out Guide
- USA People Search Opt Out Guide
- Whitepages Opt Out Guide