
Opt Out Guides
US Records Opt Out Guide
Privacy Writer
A. J. MercerAva J. Mercer
Updated
Read
5 min

Seeing your name, address, and phone number in one listing can affect your privacy, especially when it is easy to copy. US Records assembles information from common sources and displays them for lookup. This guide explains the portal steps, what to provide, and how to confirm the result so you can remove your personal information with less stress. You’ll also get screenshot tips, official page references, typical timelines, and quick fixes for common form or email issues.
How to opt out of US Records
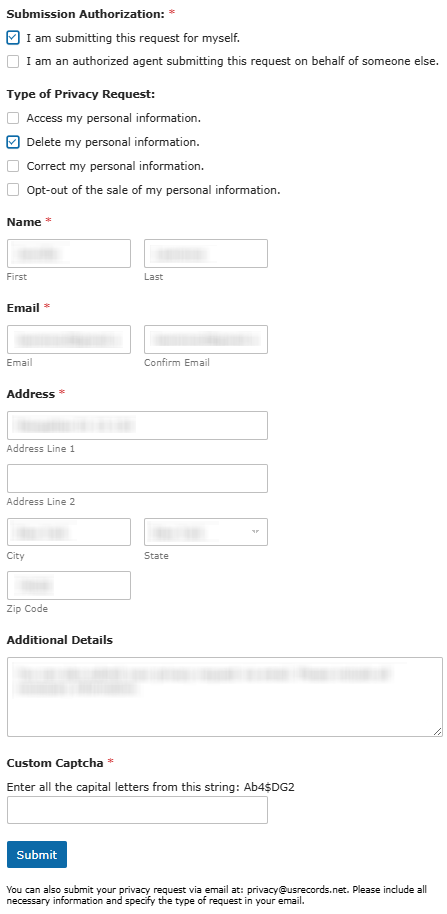
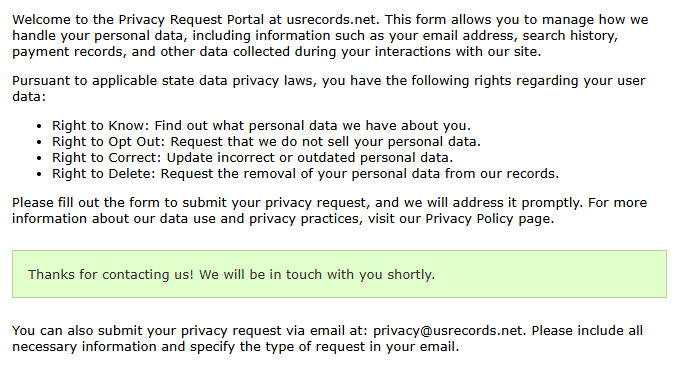
Use the Request Portal, enter your name/email/address, and send the form with CAPTCHA. Save the confirmation email for your record, then follow up if needed; it often takes 7–21 days. Keep a screenshot of the final screen.
Checklist:
- Open the official form
- Enter identifiers (name/email/address)
- Finish CAPTCHA
- Confirm via code
- Save the confirmation email
- Set a reminder to repeat
Find out if your private details were exposed
2,865,794 have already used our service
US Records – Quick Facts
| Parameter | Value |
| Domain | usrecords.net |
| Data Types | contacts, addresses, record categories, and on-site interaction data |
| Methods | web form (Request Portal) or email |
| Identity Verification | CAPTCHA and confirmation email |
| Typical Response Time | often 7–21 days (varies) |
| Re-listing Risk | medium |
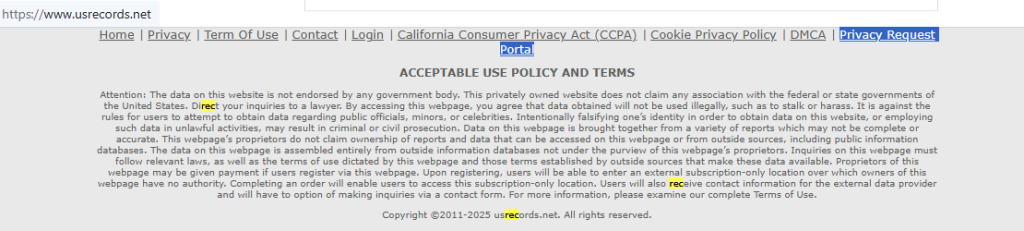
The website is among the people search websites that compile public records and commercial sources into profiles. Its privacy policy says it may collect cookies and usage signals, and share information with consent unless a court order or law enforcement requires it. The site states it is not endorsed by, or connected to, the federal government.
Common information you may find:
- Names and known aliases
- Phone numbers
- Current and past addresses
- Age range and date of birth
- Relatives (family members)
- Property and residence history
- Court records
- Criminal history indicators
- Billing activity
Step-by-Step Guide
Open the official opt-out form
Go to usrecords.net and open the Request Portal. Confirm you are on the official portal screen before you type anything. If you arrived from a third-party result, use the footer navigation to open the portal directly and bookmark it for follow-ups. If the form loads slowly, wait a moment so scripts can finish, then continue.
Submit your identifiers (name/email/address + CAPTCHA)
Choose the request type. Enter your identifiers. Solve the Custom CAPTCHA and press Submit. If there are multiple similar listings, add one extra identifier, like city and state, and keep the text factual. Before you send, double-check the spelling of your email and complete name, because small typos can slow matching. Tip: If the CAPTCHA fails, refresh once or try a different browser, and avoid autofill that inserts stray characters.
Verify via code or link (email/SMS)
Watch for an on-screen confirmation. If nothing shows in your inbox, check Spam. If you use filtering rules, temporarily disable them so the message is not moved automatically. Tip: Keep the message in a folder so you can reference it later without re-opening the form, and take a screenshot of any on-screen success banner.
Confirm deletion / Do-Not-Sell request
If your goal is broader, pick the delete choice or the “Do Not Sell” choice in the same menu and send the same identifiers. This can help restrict how certain types of data are used. If you are acting for someone else, choose the authorized-agent selection. Be ready to provide proof. Tip: Keep a short note of what you selected, so you do not mix up follow-ups later.
Track confirmation & timeline
Save the final screen, write down the date, and keep the confirmation email. If you use the email method, set the subject: opt-out request, then include the information you provide and the record URL. Store the confirmation in one folder, add a calendar reminder to re-check after the typical window, and keep a screenshot copy in a safe place. When you re-check, use a private browsing window and clear cached pages so you are not viewing an old copy. If the listing is still visible after that, repeat once and keep both confirmations for management.
Timelines, Verification & What to Expect
Most portal submissions are handled in about 7–21 days, but timing can vary. You may receive an on-screen confirmation immediately and then another message by email. Save both, and write down the date and time you sent the form. When you check again, use a private window or a different browser and clear the cache so you are seeing the live result, not a stored snapshot. If nothing arrives after 21 days, choose the “Please Contact Us” option through the portal email or the support form. After that, allow a few business days and exercise patience before checking again.
Edge Cases & Troubleshooting
- No access to the original email/phone: use the portal email route and explain the issue; include the web address for the record.
- “Record not found”: try a narrower lookup (city + state) and compare the record summary carefully.
- Email confirmation not arriving: check Spam, then resend once; if still stuck, use the support form.
- Region blocks (EU/UK/CA): if the form is blocked, email the portal and ask for the best option for your location.
- Listing vs login confusion: a deletion request for a listing is different from how to cancel a login account.
- Denied result: keep your confirmation and appeal once with the same data.
- Billing or subscription issues: if you purchase a report, charges can show on credit card statements under a third-party name; include your receipt number when you contact support.
- Old identifiers: if you retire a phone number or email, note that in “Additional Details” so they can match the correct listing.
Will my data reappear?
Listings can appear again when a data broker refreshes profiles. Re-check in a private window and clear the cache. A quick way to detect repeats is to set a monthly reminder and compare screenshots. Save dated screenshots so you can regularly compare before and after without guessing. If your information returns, send the same form again and ask to suppress it (a suppression request) to prevent fast re-posting.
Related removals
- Whitepages
- Spokeo
- BeenVerified
- TruthFinder
- Intelius
- Radaris
Manual vs Assisted Removal
Manual:
- Pros: Control each form and choose the exact listing you target; pace the work over time and apply a limit for re-checks; keep copies of confirmations to compare results across months.
- Cons: Time-consuming across many directories, especially when listings return; requires reminders and periodic spot-checks to avoid stale caches; some portals use extra verification steps that slow progress.
Assisted:
- Pros: Central dashboard tracks many listings and flags reappearances sooner; a suppression center workflow across many data broker listings; helps protect your identity with ongoing monitoring and alerts.
- Cons: Ongoing service cost plus possible upsells or tiered plans; some steps still need your confirmation, especially email checks; coverage varies by site, so review what the plan includes.
“Excellent”
We remove your data for you - faster, verified, trackable.
Discover Which Sites Share Your Private Details—Instantly and Free.
2,865,794 have already used our service
FAQ
Receive expert privacy advice by email - 1-2 times per month, no fluff.
Share Article

Posted by Ava J. Mercer
Ava J. Mercer is a privacy writer at ClearNym focused on data privacy, data broker exposure, and practical privacy tips. Her opt-out guides are built on manual verification: Ava re-tests broker opt-out processes on live sites, confirms requirements and confirmation outcomes, and updates guidance when something changes. She writes with a simple goal - help readers take the next right step to reduce unwanted exposure and feel more in control of their personal data.
76 Articles
